

I'm writing this week's post (did I post last week??) a little early to commemorate our little buddy's 2 month-day! The past two months are cluttered in my mind. Newborn days seem to both fly and creep by and there's no other way to describe the perception of time right now! I love this little kid so much. I am trying to take my time to soak up this babyness. I'm pretty sure this is our last baby, so I am trying to slow down and look down and *enjoy* these moments whether they be quiet or loud or exhausting or relief. Some days I do a really good job of focusing on B while he nurses and really tuning into the bond we're building, and then other days I'm so mentally exhausted that I just close my eyes and lean my head back, or I read a book. Or, heck, I even check facebook. It's all good.
So, what we've done the past few weeks:
Scott has been out of town a bit this month. He was gone 5 days last week, and 2 days this week. So I was alone 24 hours each day with two 3 year olds and a 7-8 week old. We have survived. I bought myself Lean Cuisine, fancy ice cream and a bottle of wine. The house was a total wreck when Scott got home, but we were mentally and physically alive and I count that as a win.
The girls have been attending zoo camp at the Columbus Zoo. Abbey went last week (Neave couldn't due to some potty training struggles) and both girls got to go this week! They are talking about Africa and have come home to tell me about petting flamingos, watering holes and camouflage. I love having these fun conversations with them!
This past week when I picked them up from camp, I took them to the new Heart of Africa section of the zoo to look around. We happened to be there right when they were starting the giraffe feedings. So both girls (and me!) got to feed the baby giraffe. It was awesome!
On the house front, we have exciting news coming this week. Ready? We are getting central air!! I am so excited. It's really the first major investment we've made that will help with the resale of this house. Plus, now B's bedroom will be conditioned next summer when he's in his own room. After this expense, I'm going to start saving for the big downstairs bathroom expansion! I'm crossing my fingers we can get to that in 2015.
Recent Posts
8.15.2014

7.25.2014
Trying the blog thing again
I am an avid blog reader. I have a long list of blogs I read on a daily, or at least weekly, basis as I sip my morning coffee. I even read blog criticism sites. For as much as read about writing, I do so little of it myself. I really just want to document our lives for my family to look back on-- a place to record the things that we're up to and a few pictures. I'm going to try to post just a weekly round up every Friday.
Since I've not written on this blog in over 2 years, let me catch you up a little.
In June, we had a baby boy! B's birth story is not what I would have liked. I was induced due to a spike in my blood pressure. First they tried a foley induction, then pitocin, then breaking my water. My body didn't really respond strongly to any of these options. And in the end, the baby didn't handle contractions well. So after about 36 hours of labor, he was born via cesarean. Turns out he had the cord wrapped around his neck and I probably had excess amniotic fluid. But regardless! He's here, and 6+ weeks later, we're adjusting to a new family member.
A and N are 3 1/2 now! I am amazing every day with how they are learning and growing. N is taking gymnastics and is actually pretty good at it. A has said she will take a class when she is older.
If you remember my previous post trying to choose paint colors for the living room, we FINALLY painted the living room this spring. We went for Nasturtium by Martha Stewart. Things are still pulling together in this room, but I'm feeling much better about it. If I can get my gallery wall finished up, I think it will be at a good holding point while we get a few more rooms accomplished.


Baby B and me in our living room. You can kind of see the new paint job! Photo by Megan Edwards Photography
We've done a variety of other things around the house in the past two years as well. The master bedroom is mostly complete. I am looking for a mirror to go over the bed and I need to move the rocking chair currently in that room to the baby's nursery when B moves in there. Hopefully I can find some time to take a few pictures in coming weeks.
We've also started replanting the backyard. There's a previous entry here about how we removed all the old beds the previous owners installed. We seeded that fall and are now slowly filling in [much] smaller new beds. There will still be plenty of grass for the kiddos to play!
In August, our plan is to get the playroom organized and maybe a little decorated. I'm not sure I can commit to painting it right now with a newborn, but we do need to get it organized and get ourselves into a good picking-up routine before B starts to crawl!
I'll share more pictures next week!
Update: I found an even better picture of the new living room decor!
Again, by Megan Edwards
11.17.2012
Long awaited updates
So you guys have been sitting on pins and needles for what... 6 months now just WAITING for a new post, right? Ok, maybe for the first week and then you forgot about this little blog. No worries, I forgot, too.
We've accomplished just a few things in the house over the summer and fall, which is primarily why I haven't been posting. Small things here and there that have made a big impact, but just seem too small to post about. This, obviously, is ridiculous and completely defeats the purpose of a blog. Blogs are where you SHOULD post the little things that happen daily. I'm going to do a few catch up posts between now and Christmas to get everyone back up to speed before we (hopefully) start doing some more winter work around here.
Here's a photo of what I'm contemplating right now.

That's right, coral paint in the living room. Risky? absolutely. Cozy and beautiful and getting me excited to be in this room more? Absolutely times two! What do you think? Is it too bold for our little cottage?
We've accomplished just a few things in the house over the summer and fall, which is primarily why I haven't been posting. Small things here and there that have made a big impact, but just seem too small to post about. This, obviously, is ridiculous and completely defeats the purpose of a blog. Blogs are where you SHOULD post the little things that happen daily. I'm going to do a few catch up posts between now and Christmas to get everyone back up to speed before we (hopefully) start doing some more winter work around here.
Here's a photo of what I'm contemplating right now.

That's right, coral paint in the living room. Risky? absolutely. Cozy and beautiful and getting me excited to be in this room more? Absolutely times two! What do you think? Is it too bold for our little cottage?
4.25.2012
Aaaaand Reality Sets In
I've heard in the past, mostly on TV but through a few friends, too, about how long redecorating and renovations take. Not "can" take or "might" take. Just take. I was in denial. Yes, I know we have a 10 year plan for this house. But that's really about budgeting and saving up for the big things we want to do. I know gutting a kitchen is a several month planning & doing process. But I'm redecorating a bedroom. SURELY (famous last words coming...) I can get it all pulled together in a month. I have a vision! I already know what I want!
So we're nearing the end of month #2. I had true, good, honest intentions of having 2 posts in March. The first would be "Acquiring Stuff" where I'd tell you all about my fun and oh so very productive shopping trip in and around Cincinnati. I'd show you pictures and we'd talk about all the lovely directions our modern cottagey bedroom would be going in. Then my second post at the end of the month would be The Final Reveal! (!!! added for emphasis and excitement). Well.
That is not reality. The reality is that I ordered our bed the first Saturday of March (more on that later, I am really excited about it!) and it was a 6-8 week time table. Unfortunately, that was delayed by a death in the woodworker's family (totally understandable. I am horribly sad for him and not irritated or impatient. Only a small part of the lack of impatience is because I've not done anything else that needs to be done before install). So he just started our bed this week. We're looking at another 4 weeks from now to get that done. I still need to do painting and staining and general re-doing on 3 pieces of furniture that are going into the room. And I need to buy a duvet and sew curtains. And general do everything but buy stuff. So the entire project is on a long delay. But it will be ok. Because it will be done soon(ish) and it will be lovely and wonderful. Eventually.
I will be back over the weekend with a recap of my Cincinnati shopping trip and a few other pieces I've found along the way. I really did have a good time at IKEA and other places all by myself!
So what had taken longer than expected for you? Anyone else have dramatically unrealistic expectations about how long a project is going to take?
So we're nearing the end of month #2. I had true, good, honest intentions of having 2 posts in March. The first would be "Acquiring Stuff" where I'd tell you all about my fun and oh so very productive shopping trip in and around Cincinnati. I'd show you pictures and we'd talk about all the lovely directions our modern cottagey bedroom would be going in. Then my second post at the end of the month would be The Final Reveal! (!!! added for emphasis and excitement). Well.
That is not reality. The reality is that I ordered our bed the first Saturday of March (more on that later, I am really excited about it!) and it was a 6-8 week time table. Unfortunately, that was delayed by a death in the woodworker's family (totally understandable. I am horribly sad for him and not irritated or impatient. Only a small part of the lack of impatience is because I've not done anything else that needs to be done before install). So he just started our bed this week. We're looking at another 4 weeks from now to get that done. I still need to do painting and staining and general re-doing on 3 pieces of furniture that are going into the room. And I need to buy a duvet and sew curtains. And general do everything but buy stuff. So the entire project is on a long delay. But it will be ok. Because it will be done soon(ish) and it will be lovely and wonderful. Eventually.
I will be back over the weekend with a recap of my Cincinnati shopping trip and a few other pieces I've found along the way. I really did have a good time at IKEA and other places all by myself!
So what had taken longer than expected for you? Anyone else have dramatically unrealistic expectations about how long a project is going to take?
2.21.2012
Goals for 2012
I know most people like to start each new year with resolutions right out of the gate on January 1. I tend to be a little slower with honing in on my goals. I want to take the time to really look at how the year is shaping up, get beyond the chaos of the holiday season and really hone in on where I'd like myself, my family, and our activities to be at the start of next year.
My overarching goal this year is to become more healthy in all areas of my life. Yes, this does include losing weight and being more healthy physically but beyond that I want to become more healthy mentally, spiritually, financially and relationally. I don't just want to watch numbers on a scale decline, I want to eat nutrient rich food; I want to get stronger; and I want my body to feel good. Mentally, I just want learn more about myself and how I work and how I would LIKE to work. I have issues, dudes; we all do, and I just want to be more conscious of them and learn how to deal with them in the best way possible. Spiritually, I want to have a healthier relationship with God. I'm not setting some numbered goal like "reading my Bible every day for 30 minutes". Though, that's a great thing to do, and setting measurable goals like that are very helpful for some people. However, I'm going for an overall healthy spiritual relationship. I am doing a Bible study with a group of women, so I want to stay up to date with that and I want to have a consistent prayer life. Our financial goals are going well, too. I've read several personal finance books already and learned A LOT. And we just paid off our last credit card! Yahoo! And relationally, I just want to continue investing in other people and developing deep and deeper friendships with people I have just met here in Delaware as well as long time friends who I know I should make much more of an effort to communicate with. This also includes just taking more time to really develop mine and Scott's marriage. We'll hit 4 years married this year, which is exciting, and I just want this 5th year to be amazing.
Now, on to our house goals, since that's what this blog is really all about. I have 3 main goals for this year.
1. Completely do our master bedroom. There really is no "re-do" about it. It's just a hodge podge of left over items from the past few years and an uncomfortable full size mattress. We'll be tackling this project in the month of March, so look out!
2. Purchase a new couch. Our current couch pretty much didn't make it through our last move. I was in denial for awhile, but truthfully, it's in sad shape. It's uncomfortable and sagging in the middle, and pretty hard to get out of. So by the end of the year, I will research and find and purchase the perfect couch for our family and home.
3. Finally finish the girls' nursery. I need to buy, paint and purchase 16 drawer pulls. I need to hang some art, and decide what to do with the 2nd closet for now. Maybe a reading nook? Or a craft desk? Who knows. Ideas are welcome.
4. Some mini-projects that come along. Basically, I'm keeping my eyes open, and I have a few things already at the house and ready to be finished. I'm not going to turn down the perfect pair of accent chairs in the living room just because my goal is to finish the bedrooms.
5. Plant some flowers in the backyard. And maybe some vegetables.
6. We're going to save up money to do a knock-down-a-wall renovation in the next 2 years.
7. And I may or may not put the finishing touches on Scott's office. We'll see.
So there's the plan this year. Slow and steady wins the race, right? Oh, and a final goal. I want to post on this blog at least twice a month. That was the original plan, and last fall I got mired in the "what do I post??" conundrum. From now on, I'm just going to post twice a month about life in this cottage. If I've done a project or hung some art, I'll include that. If not, well, I'll include that, too!
What are your 2012 goals? I'd love to hear them!
My overarching goal this year is to become more healthy in all areas of my life. Yes, this does include losing weight and being more healthy physically but beyond that I want to become more healthy mentally, spiritually, financially and relationally. I don't just want to watch numbers on a scale decline, I want to eat nutrient rich food; I want to get stronger; and I want my body to feel good. Mentally, I just want learn more about myself and how I work and how I would LIKE to work. I have issues, dudes; we all do, and I just want to be more conscious of them and learn how to deal with them in the best way possible. Spiritually, I want to have a healthier relationship with God. I'm not setting some numbered goal like "reading my Bible every day for 30 minutes". Though, that's a great thing to do, and setting measurable goals like that are very helpful for some people. However, I'm going for an overall healthy spiritual relationship. I am doing a Bible study with a group of women, so I want to stay up to date with that and I want to have a consistent prayer life. Our financial goals are going well, too. I've read several personal finance books already and learned A LOT. And we just paid off our last credit card! Yahoo! And relationally, I just want to continue investing in other people and developing deep and deeper friendships with people I have just met here in Delaware as well as long time friends who I know I should make much more of an effort to communicate with. This also includes just taking more time to really develop mine and Scott's marriage. We'll hit 4 years married this year, which is exciting, and I just want this 5th year to be amazing.
Now, on to our house goals, since that's what this blog is really all about. I have 3 main goals for this year.
1. Completely do our master bedroom. There really is no "re-do" about it. It's just a hodge podge of left over items from the past few years and an uncomfortable full size mattress. We'll be tackling this project in the month of March, so look out!
2. Purchase a new couch. Our current couch pretty much didn't make it through our last move. I was in denial for awhile, but truthfully, it's in sad shape. It's uncomfortable and sagging in the middle, and pretty hard to get out of. So by the end of the year, I will research and find and purchase the perfect couch for our family and home.
3. Finally finish the girls' nursery. I need to buy, paint and purchase 16 drawer pulls. I need to hang some art, and decide what to do with the 2nd closet for now. Maybe a reading nook? Or a craft desk? Who knows. Ideas are welcome.
4. Some mini-projects that come along. Basically, I'm keeping my eyes open, and I have a few things already at the house and ready to be finished. I'm not going to turn down the perfect pair of accent chairs in the living room just because my goal is to finish the bedrooms.
5. Plant some flowers in the backyard. And maybe some vegetables.
6. We're going to save up money to do a knock-down-a-wall renovation in the next 2 years.
7. And I may or may not put the finishing touches on Scott's office. We'll see.
So there's the plan this year. Slow and steady wins the race, right? Oh, and a final goal. I want to post on this blog at least twice a month. That was the original plan, and last fall I got mired in the "what do I post??" conundrum. From now on, I'm just going to post twice a month about life in this cottage. If I've done a project or hung some art, I'll include that. If not, well, I'll include that, too!
What are your 2012 goals? I'd love to hear them!
2.02.2012
Oh My Gosh... I found them
I know there's been a lack of posts since... October maybe? Sorry about that. The truth is, there has been a lack of projects. Lots of holiday travelling and then sickness, but I'm getting back on track now.
I just had to do a quick update because I am so very excited about what I just found thanks to pinterest. If you would remember back to this post in May of last year, I've been on the hunt for very specific pulls for the built in drawers in the girls' shared room. I found 8 on ebay and thought the other 16 would be easy to come by, since those 8 just fell into my lap. It was not so.
But today. Oh, beautiful Groundhog Day, they have come to me. Long story short, I'm looking for other hardware for 2 furniture re-dos coming up in the next two months and Camila from Effortless Style posted some pieces I was interested in for those new projects. I decided to browse around Ansaldi & Sons hardware after finding several awesome options for the new projects and I found these:

The EXACT same as the 8 bail pulls hiding in my office cabinet. I am so excited. Next month, the money for 16 of these is going to be in the budget! I still plan to paint the white porcelain backplates something fun like turquoise or hot pink, but I haven't quite decided what yet. I'm just so excited to have found them!
Thanks for sticking with me. In a few weeks I'll [hopefully] be back with our new media cabinet!
I just had to do a quick update because I am so very excited about what I just found thanks to pinterest. If you would remember back to this post in May of last year, I've been on the hunt for very specific pulls for the built in drawers in the girls' shared room. I found 8 on ebay and thought the other 16 would be easy to come by, since those 8 just fell into my lap. It was not so.
But today. Oh, beautiful Groundhog Day, they have come to me. Long story short, I'm looking for other hardware for 2 furniture re-dos coming up in the next two months and Camila from Effortless Style posted some pieces I was interested in for those new projects. I decided to browse around Ansaldi & Sons hardware after finding several awesome options for the new projects and I found these:

The EXACT same as the 8 bail pulls hiding in my office cabinet. I am so excited. Next month, the money for 16 of these is going to be in the budget! I still plan to paint the white porcelain backplates something fun like turquoise or hot pink, but I haven't quite decided what yet. I'm just so excited to have found them!
Thanks for sticking with me. In a few weeks I'll [hopefully] be back with our new media cabinet!
12.11.2011
Scott's Office, Phase 1 Complete
I mentioned back in August in this post that I wanted to decorate Scott's office so he felt organized and ready to work in his new job. I definitely made a lot of progress quickly, and now we're stalled out while I search for some fabrics. But let's talk through what's already done. As you look through, I obviously having 'styled' the room yet. I had an extra 20 minutes while the girls napped, so I ran up and took these pictures. When I show you the final product, it will be much more put together! Remember, this is just Phase One!
 First, I found this amazing antique kilim rug at a local store (I mentioned it in this post). This was actually my second choice, but the dealer for this rug was at the store at the time and would negotiate with me. I literally got it for a third of the price of the other rug. And I loved the colors and pattern on this rug anyway. Score. So the rug became the jumping off point for the entire room.

Next stop: HomeGoods. I went here searching for bedding for the twin sized guest bed we keep in this room. I knew I wanted one pillow for the bed that would tie everything together, and low and behold Ralph Lauren came through for me. I found the striped, kilim-inspired pillow on sale there as well as a cheap neutral to just add some height since the bed doesn't have a headboard. Once I found the pillow, it was easy to choose a solid brown coverlet and crimson sheets.

See, crimson was necessary in the room so that we could hang Scott's Ph.D. diploma from the University of Oklahoma. It's just not an office without a diploma on the wall. The other two pieces of art are photos from a calendar that I Mod Podged onto some art canvases. First, I spray painted the sides of the canvases black so they looked finished and then just glued the photos on. If you ever do this, do NOT freak out like I did when the calendar ripples. I freaked out and ended up creasing the paper. I really think if I had just left it alone to dry it would have been much smoother.
 In this corner, there is a message board, Scott's current calendar and a bookcase. This bookcase is actually a hutch from an IKEA desk I got off of craigslist. The desk is in the basement. I want to paint this or otherwise refinish it, but that will be in phase 2.
So what's left?
 First, I found this amazing antique kilim rug at a local store (I mentioned it in this post). This was actually my second choice, but the dealer for this rug was at the store at the time and would negotiate with me. I literally got it for a third of the price of the other rug. And I loved the colors and pattern on this rug anyway. Score. So the rug became the jumping off point for the entire room.

Next stop: HomeGoods. I went here searching for bedding for the twin sized guest bed we keep in this room. I knew I wanted one pillow for the bed that would tie everything together, and low and behold Ralph Lauren came through for me. I found the striped, kilim-inspired pillow on sale there as well as a cheap neutral to just add some height since the bed doesn't have a headboard. Once I found the pillow, it was easy to choose a solid brown coverlet and crimson sheets.

See, crimson was necessary in the room so that we could hang Scott's Ph.D. diploma from the University of Oklahoma. It's just not an office without a diploma on the wall. The other two pieces of art are photos from a calendar that I Mod Podged onto some art canvases. First, I spray painted the sides of the canvases black so they looked finished and then just glued the photos on. If you ever do this, do NOT freak out like I did when the calendar ripples. I freaked out and ended up creasing the paper. I really think if I had just left it alone to dry it would have been much smoother.
 In this corner, there is a message board, Scott's current calendar and a bookcase. This bookcase is actually a hutch from an IKEA desk I got off of craigslist. The desk is in the basement. I want to paint this or otherwise refinish it, but that will be in phase 2.
So what's left?
- find a side table for the bed. We just need something small where we can set a glass of water and a book for guests. I think guests would also want a table for a cell phone or alarm clock so they don't feel weird about using Scott's work desk.
- fabric on the roller shades. I have one chosen, I think. I just need to determine how many yards I need and the best way to attach the fabric. I think this will really add another lay of texture and warmth and make everything look more finished. Not to mention that Scott has discovered that on really bright days, these shades do basically nothing for the blinding light on the south side of the house.
- fabric to cover the lampshades. There are 2 lampshades in the room. I haven't decided if they will match or not. I guess it depends on which fabric I choose.
- paint/refinish the bookcase
- accessorize as necessary. Always the most fun, and for me, the most challenging part of a room. I know I'd like a throw or some sort of patterned blanket on the end of the bed. And probably nifty objects on the bookcase and side table, too.

Have any of you combined an at-home office with a guest room? Any essentials I'm missing? What do you think about matching lampshades?
10.26.2011
Quick Backyard Update
Wow, Autumn has just flown by! I can't believe our twins will be ONE YEAR OLD in less than a week! There have been some pretty exciting things going on around here that I plan to share with you all over the next month or so. Hopefully I can play catch up and get everyone up to date with the changes that have been happening around our cottage.
This update is about our backyard. I don't think I've mentioned it much here, because, honestly, it wasn't anywhere near the top of my punchlist until mid September. One Friday I walked outside and was just completely overwhelmed with the state of the yard. I knew when we bought the house that I wanted to pull up the majority of the beds and lay some grass down. See, the former owners of this house were retired and GREAT gardeners (so it seems to me after seeing their work back there!). But I have neither the time nor the knowledge to keep up with everything they had done. Not to mention that our grass was literally a 4 foot by 2 foot patch. That, my friends, is not enough grass for two little girls to have picnics and play times!
Back to September. With this overwhelmed feeling, I realized that next spring and summer, our girls will definitely be at an age where toddling around in the grass will be an amazing way to spend a morning. Honestly, I kind of panicked. So I borrowed a page from the Young House Love book and made a post on craigslist-- You dig it up, you can HAVE it. I figured it was free labor for us in exchange for some plants that I had no intentions of transplanting somewhere else in the already full yard. We had a couple and then a young man, Kenny, come by. It took them two hours,but they removed about 40 hostas, countless ferns, bushes, grasses, stones and bricks. The next weekend, my parents visited and my dad helped us dig out a forsythia, 2 boxwoods, and what felt like miles of winter creeper vine. Our yard went from the overgrown mess that you saw above to this:
Big transformation, right? But there were still those huge evergreen bushes and a spindly pine tree that constantly made me nervous as it leaned against our power lines. So, we hired the aforementioned Kenny to come in and clean it up back there. He (and his dad, it turns out) came out last Sunday and chainsawed all the monster bushes down. They also added a little top soil, feathered it out and put down a ton of grass seed. Now our backyard looks like this:
 Yes, that fence is unsafe and pretty awful looking. We knew it would need to be replaced, but now that we've taken down the bushes hiding the worst of it, it's looking as though we will need to replace is next spring--before we have babies playing out there. Next spring we'll also add a butterfly garden alongside the garage, some honeysuckle, hydrangea, and other shade-loving flowering plants along the back fence, possibly a weeping tree of some variety, and, if I'm feeling REALLY brave, a tiny piece of a vegetable garden with a rosemary bush. We use a lot of rosemary around here; I think a bush is completely necessary. And maybe I'll try to refinish some of our existing outdoor furniture to make a nice place for some barbequeing with friends next year!
So there you are. We've started a new project that only adds more bullets on our to do list! But I am so very excited to watch our little shoots of grass pop up and then to see our little girls playing in it next year!
How about you? Have you done any fall landscaping this month? What are your plans for the spring? Do you know of some pretty bushes that love shade and attract butterflies?
 |
| Taken the day before all the beds were dug up. Very pretty, but very high maintenance. |
This update is about our backyard. I don't think I've mentioned it much here, because, honestly, it wasn't anywhere near the top of my punchlist until mid September. One Friday I walked outside and was just completely overwhelmed with the state of the yard. I knew when we bought the house that I wanted to pull up the majority of the beds and lay some grass down. See, the former owners of this house were retired and GREAT gardeners (so it seems to me after seeing their work back there!). But I have neither the time nor the knowledge to keep up with everything they had done. Not to mention that our grass was literally a 4 foot by 2 foot patch. That, my friends, is not enough grass for two little girls to have picnics and play times!
 |
| another angle of before |
 |
| where the beds used to be!! This is after the initial craigslist posting |
 |
| no more monster evergreens or shaggy pine tree! |
 Yes, that fence is unsafe and pretty awful looking. We knew it would need to be replaced, but now that we've taken down the bushes hiding the worst of it, it's looking as though we will need to replace is next spring--before we have babies playing out there. Next spring we'll also add a butterfly garden alongside the garage, some honeysuckle, hydrangea, and other shade-loving flowering plants along the back fence, possibly a weeping tree of some variety, and, if I'm feeling REALLY brave, a tiny piece of a vegetable garden with a rosemary bush. We use a lot of rosemary around here; I think a bush is completely necessary. And maybe I'll try to refinish some of our existing outdoor furniture to make a nice place for some barbequeing with friends next year!
So there you are. We've started a new project that only adds more bullets on our to do list! But I am so very excited to watch our little shoots of grass pop up and then to see our little girls playing in it next year!
How about you? Have you done any fall landscaping this month? What are your plans for the spring? Do you know of some pretty bushes that love shade and attract butterflies?
8.21.2011
An Unexpected Project
In my last post, I mentioned two projects I was hoping to tackle in the coming months--a mini-redo of our upstairs full bath and getting started on the full redo of our sunroom. I was gathering images and sources for a variety of pieces in each of these rooms. In fact, I bought three fabrics to get started on cushion for the sunroom wicker furniture we picked up at the NNA Free-Cycle day.
Then Scott (and our entire family) was blessed with a new job. There are so many great benefits to the job, but one of the biggest benefits is that [when he's not travelling] Scott will be working from home! Since we've moved into the house, Scott's had some "man space" in our basement. He does his workouts and music down there. But since he'll be spending about 8 hours a day in his new office, he didn't want to stay down in the basement. So we're moving his home office to our 4th bedroom upstairs.
 It just so happened that the day I started searching for inspiration for the office decorating, the Pottery Barn Home:Work catalog came! There were two images that were really inspiring to me, and this photo is one of them. I love the warmth and how it looks comfortable but organized for a good working environment.
The original listing of the house called this room an "upstairs porch." One wall is completely covered in windows and then there are two more large windows two other walls. This is one of the challenges of this space! So I'll be figuring out the best kind of window coverings for the space so Scott can best control the amount of light in the room. The next challenge for the room is the size. It is 11'5" by 7'7" which is pretty small for any sort of office space! It's basically a cubicle with lots of windows. Oh, and we keep a twin size guest bed in there, too!
 Scott will be in Chicago tomorrow (Monday) through Friday, so I am hoping to get a bit of the work done this week while he's gone. Today I took a hour to myself to peruse the antiques stores downtown, and found a great antique kilim rug! This will definitely be the jumping off point for the entire room.
So what's left?
Then Scott (and our entire family) was blessed with a new job. There are so many great benefits to the job, but one of the biggest benefits is that [when he's not travelling] Scott will be working from home! Since we've moved into the house, Scott's had some "man space" in our basement. He does his workouts and music down there. But since he'll be spending about 8 hours a day in his new office, he didn't want to stay down in the basement. So we're moving his home office to our 4th bedroom upstairs.
 It just so happened that the day I started searching for inspiration for the office decorating, the Pottery Barn Home:Work catalog came! There were two images that were really inspiring to me, and this photo is one of them. I love the warmth and how it looks comfortable but organized for a good working environment.
The original listing of the house called this room an "upstairs porch." One wall is completely covered in windows and then there are two more large windows two other walls. This is one of the challenges of this space! So I'll be figuring out the best kind of window coverings for the space so Scott can best control the amount of light in the room. The next challenge for the room is the size. It is 11'5" by 7'7" which is pretty small for any sort of office space! It's basically a cubicle with lots of windows. Oh, and we keep a twin size guest bed in there, too!

So what's left?
- window coverings (roller shades which will eventually be covered with some fabric for visual interest)
- sewing a duvet cover to put on the comforter currently on the twin bed.
- sew some large pillow shams to turn bed into more of a daybed/couch.
- paint lamp base & recover lamp shade
- find very small bookcase/night stand. refinish as needed.
- recover office chair in microsuede (?) and add nailhead trim. restain dated oak finish something darker.
- frame some calendar photos and hang with Scott's Ph.D. diploma.
- desk accessories as needed.
What ideas do you have? What do you consider an essential part of a home office?
7.31.2011
General Maintenance
July has flown by with a lot of planning and really boring so-called projects. I'm just going to do a short list so you know I've not just been sitting on my laurels not writing blog posts. There just hasn't been anything really warranting it's own post and I keep thinking of projects to do and they get pushed to the way-side for general maintenance things like cleaning the kitchen and sorting through the next size of baby clothes to get them washed and ready for growing girls!
 1. I trimmed the vines over and around our entry way. These vines were one of the first draws to this house. I mean, what says "charming cottage" better than some glorious late summer vine-age hanging over a lovely blue door? Nothing. But they are a BEAST in the maintenance department. About 2 months ago, I caught the vines attempting to break in our front door, so I trimmed those back a little. Then I realized that the vines were completely taking over the side of the vestibule and attempting to sneak in through the sunroom. But don't worry, I stopped them. For now.
2. Scott got a Weed-Eater and it's awesome. We were trying to purchase lawn care items that are more toward the manual end of the spectrum and less toward the gas-powered monsters end. Back in April we trotted over to Lowe's and picked up a Fiskar's Reel Mower. It's a great work out for Scott and just perfect for the size of our yard. I don't think a gas-powered monster would even work in our backyard! We did a long search for some sort of manual edger/weed-eater guy and came up with nothing. A few online antique stores had options that were pretty much rusted immobile. Luckily, Free-Cycle day came, and we got an electric version from our neighbors. It only cost us a 100ft $40 extension cord. And now our lawn looks MUCH better. Still needs some work, but I'm not worried our neighbors hate us anymore.
3. Also on Free-Cycle Day in our neighborhood (sponsored by the Northwest Neighborhood Association and Sustainable Delaware), we also picked up a set of wicker furniture. It's in great structural shape, but it needs some cosmetic help. The finding/making of cushions as well as repainting the set and deciding where it shall live is on the docket for a post, or posts, to come soon.
 4. We took down all the old-fashioned valances, shower curtain and curtains (could they even be called curtains?) in the guest room. It feels so, so great! The dining room feels much lighter and more open now, the guest bedroom looks less like an experiment in color and pattern gone bad, and the bathroom has sparked some ideas.
5. I covered an old stationary box with some brown Kraft paper to make a jewelry box. It's much better than the previous look, but I do hope to embellish it a little more sometime.
5. I've been practicing my calligraphy a lot. I am really hoping to be open for business as Bespoke Letterings next spring in time for the summer wedding season. We shall see.
6. We're planning for a mini re-do in the upstairs bathroom. Since this bathroom--our only full bath that we share with guests and will someday share with our kids-- is at the bottom of the "let's completely gut this and start over" renovation list, we think we may do a few touch up projects to make it more enjoyable, and in some cases usable, for us over the next decade. My next post will be about the planning for this project. And then hopefully we'll actually get around to doing it and I'll share all the fun stories.
8. I had really hoped to participate in the Young House Love/Katie Bower/Emily Henderson and friend Pinterest Challenge this weekend (you can see their fun video invitation to join in here), and I even decided which project I would tackle. And then I never made it to the fabric store this week. But I still intend to complete my project and share it with the world. It just may be late. Can I get an extension, please, Sherry?
So, what have you all been up to? Any summer maintenance I should know about as a new home owner? Have you ever gotten some awesome furniture for free? What did you do with it? What projects from pinterest have you tackled? Do you like my current plan for a business name--Bespoke Letterings?
 1. I trimmed the vines over and around our entry way. These vines were one of the first draws to this house. I mean, what says "charming cottage" better than some glorious late summer vine-age hanging over a lovely blue door? Nothing. But they are a BEAST in the maintenance department. About 2 months ago, I caught the vines attempting to break in our front door, so I trimmed those back a little. Then I realized that the vines were completely taking over the side of the vestibule and attempting to sneak in through the sunroom. But don't worry, I stopped them. For now.
 |
| what our reel mower looks like (photo from Lowe's.com). Scott loves it! |
3. Also on Free-Cycle Day in our neighborhood (sponsored by the Northwest Neighborhood Association and Sustainable Delaware), we also picked up a set of wicker furniture. It's in great structural shape, but it needs some cosmetic help. The finding/making of cushions as well as repainting the set and deciding where it shall live is on the docket for a post, or posts, to come soon.
 4. We took down all the old-fashioned valances, shower curtain and curtains (could they even be called curtains?) in the guest room. It feels so, so great! The dining room feels much lighter and more open now, the guest bedroom looks less like an experiment in color and pattern gone bad, and the bathroom has sparked some ideas.
5. I covered an old stationary box with some brown Kraft paper to make a jewelry box. It's much better than the previous look, but I do hope to embellish it a little more sometime.
5. I've been practicing my calligraphy a lot. I am really hoping to be open for business as Bespoke Letterings next spring in time for the summer wedding season. We shall see.
6. We're planning for a mini re-do in the upstairs bathroom. Since this bathroom--our only full bath that we share with guests and will someday share with our kids-- is at the bottom of the "let's completely gut this and start over" renovation list, we think we may do a few touch up projects to make it more enjoyable, and in some cases usable, for us over the next decade. My next post will be about the planning for this project. And then hopefully we'll actually get around to doing it and I'll share all the fun stories.
8. I had really hoped to participate in the Young House Love/Katie Bower/Emily Henderson and friend Pinterest Challenge this weekend (you can see their fun video invitation to join in here), and I even decided which project I would tackle. And then I never made it to the fabric store this week. But I still intend to complete my project and share it with the world. It just may be late. Can I get an extension, please, Sherry?
So, what have you all been up to? Any summer maintenance I should know about as a new home owner? Have you ever gotten some awesome furniture for free? What did you do with it? What projects from pinterest have you tackled? Do you like my current plan for a business name--Bespoke Letterings?
6.29.2011
To Add Another Word
We're fixing to head to my home state of Alabama (like how I dropped in some sweet-home-slang?) for an extended Independence Day weekend, but I wanted to do a quick post with an addition to my previous post.
The past week or two, I've been really taken with a variety of images that could be described no other way but "coastal." I don't have the amazing ocean views that many of these rooms have, but I just can't get enough of the soothing color combinations with livable (meaning, heavy duty) fabrics and style.
There are hints of water-living, a sail boat on a mantle or some sea glass in a vase, but there isn't an early 90s nautical theme vibe to be found. It may seem strange to have coastal as an inspiration when living in the Midwest in a state with no beaches (sorry, but the Great Lakes don't count as 'beaches' for a Southern gal!) but I do hope adding small elements of coastal living will add a feeling of relaxation and comfort into our daily hustle and bustle!
Therefore, consider this an amendment to the last post. Our home's style words are tailored, sophisticated, coastal cottage. How do you think those will work together? Any tips on how to blend these 4 styles?
I've got some post ideas for the week after our trip, so stayed tuned!
 |
| from Coastal Living |
 |
| from Sarah Richardson Design |
There are hints of water-living, a sail boat on a mantle or some sea glass in a vase, but there isn't an early 90s nautical theme vibe to be found. It may seem strange to have coastal as an inspiration when living in the Midwest in a state with no beaches (sorry, but the Great Lakes don't count as 'beaches' for a Southern gal!) but I do hope adding small elements of coastal living will add a feeling of relaxation and comfort into our daily hustle and bustle!
 |
| from Coastal Living |
Therefore, consider this an amendment to the last post. Our home's style words are tailored, sophisticated, coastal cottage. How do you think those will work together? Any tips on how to blend these 4 styles?
I've got some post ideas for the week after our trip, so stayed tuned!
6.18.2011
Defining Style and Getting Started
A few weeks ago, I was sharing some tentative plans for our dining room re-do that we may or may not be doing later this summer with my best friend and she pointed out that she had no idea what type of style I was shooting for overall in our house. I looked at my past blog posts and realized that I never wrote out a post planned early on about our overall style inspiration for this house!
For Christmas 2010, I was gifted the Domino: The Book of Decorating. It is a wonderful--priceless, really- resource for a novice decorator. The first chapter is "Getting Started," and it gives a step by step process of decorating a room. Their method is intuitive and just plain makes sense, so that's really what I've been following.
The process outlined in the book is how to go room-to-room in your decorating. But I really want our entire house to feel cohesive, so I decided to first complete the "getting started" process with ideas for the house as a whole, and then as time goes along I'll break it down room to room. Here's the process with my notes for our little cottage.
1. Find inspiration: cast a wide net, start a file, and look for themes. I've found tons of inspiration photos from various sites and magazines (House Beautiful is a favorite of mine) that are examples of how I'd like our house to feel. I've sprinkled some of my favorite inspiration shots throughout this post.
2. Determine your style. This is where you assess all the inspiration and ideas you've gathered so far and try to attach some descriptive words to them. According to Domino this can really help "you focus and filter out the things that don't fit, and pinpoint those that do. it makes it easier to answer the question 'Is this me?'" I whole heartedly agree with that statement, and couldn't say it better myself. So I didn't.
The words for our house, so far, stand at Tailored, Sophisticated, Cottage. So what do these words mean?
Tailored-- Scott and I both appreciate the mid-century modern aesthetic, but these looks can very quickly become outdated when grouped together. Mid-Century Modern tends to use graphic and clean lines (not to mean always straight), and geometric prints in a variety of colors. I really want to take the spirit of this style and blend it with other ideas. This thread of design will come through in us looking for clean lines in our furniture choices, modern geometric prints and splashes of color.
Sophisticated-- This really speaks to my more traditional side. I love some turned legs on a table. And I also like curvy chandeliers and impressionist art. I think this term also speaks to having a more edited space; I'm going to try my absolute hardest to kill the clutter-lover within me and focus in on the few things that I truly find beautiful or useful and not to buy or show pieces that just take up space.
Cottage-- This may seem to clash with the sophisticated side, but I want the entire house to feel comfortable and breezy. I want the [edited, limited number?] items that we do showcase to have real character and give our collections time to really be acquired and not all purchased at a big box store. We have some really great antique shops here in Delaware, and I fully intend to become well acquainted with them all!
3. Consider how you'll use the room. I want our entire house to be USED. I don't want a room cordoned off because it's "too nice" for the kids to use. I want our family and our guests to feel welcome and comfortable going anywhere in our house. Our home should be a home and not a show piece, while still being beautiful.
4. Assess your stuff. This will be an on going process. As I've said before, we have many pieces that I bought intending them to be 'forever' and I think they will be. A few of these are the dining room set, the piano, the guest room bed and a few lamps. We'll just have to wait and see what happens with everything else.
5. Draw up a floor plan. We'll be doing this room by room, though I have started thinking about the overall floor plan of the house and thinking about whether or not we may want to make a few really big changes (knocking down walls, etc) in the future.
6. Set a budget. Again, this will be happening in a room by room basis.
7. Research, Research, Research. If you've seen my pinterest, you know I do this already! I'm always looking for new ideas, new products, and vendors for the products I've gotten into my head that I won't be compromising on (such as a navy blue linen-esque track arm sectional sofa with a sleeper and a left arm chaise...I.will.find.you.).
8. Create a design scheme. This is a transition step where you consolidate all the information you've gathered--your floor plan, the items you need to purchase, pieces you're keeping, images of favorite items and fabrics and paints, etc. Then you assess how it all fits together, think on your priorities and make changes to your plans accordingly. I think making a rudimentary mood board would be a huge help in this step.
9. Make a decorating schedule. We're still working on this, too! I have a meeting in July to talk to a kitchens and bath contractor who can give me a better idea of the costs for renovating both the downstairs powder room and the kitchen. Then it's time to save, save, save!! We'll be paying for all of our renovations and redecorating with cash-- no credit! So we're in this for the long haul! I am hoping to get at least one room in the house decorated by the end of the year. It's likely to be the dining room since we have most of the furniture there already and it would be a cheaper room to finish. More on this later!
So there you are. The 9 step decorating process from Domino: The Book of Decorating and where we really are in the process.
Now that you know my overall design scheme, do you have any suggestions for brands or designers I need to check out for inspiration? Any ideas on color schemes? Anybody want to give me about $25,000 so we can knock down a wall in the bathroom soon?
For Christmas 2010, I was gifted the Domino: The Book of Decorating. It is a wonderful--priceless, really- resource for a novice decorator. The first chapter is "Getting Started," and it gives a step by step process of decorating a room. Their method is intuitive and just plain makes sense, so that's really what I've been following.
The process outlined in the book is how to go room-to-room in your decorating. But I really want our entire house to feel cohesive, so I decided to first complete the "getting started" process with ideas for the house as a whole, and then as time goes along I'll break it down room to room. Here's the process with my notes for our little cottage.
1. Find inspiration: cast a wide net, start a file, and look for themes. I've found tons of inspiration photos from various sites and magazines (House Beautiful is a favorite of mine) that are examples of how I'd like our house to feel. I've sprinkled some of my favorite inspiration shots throughout this post.
 |
| Designer: Annie Selke in House Beautiful This image from House Beautiful is one of my original inspirations for the house as a whole. I love that it feels comfortable and cozy while still being light and airy. It really looks as though a family with young children could live here (minus the ivory sofas). It feels young, yet sophisticated. It also is a great use of neutrals, and I think it could transition between seasons very easily by switching out the bright yellow with rust and orange for fall, and deep reds and greens for winter. |
The words for our house, so far, stand at Tailored, Sophisticated, Cottage. So what do these words mean?
 |
| Leah at House Obsession's kitchen. |
Sophisticated-- This really speaks to my more traditional side. I love some turned legs on a table. And I also like curvy chandeliers and impressionist art. I think this term also speaks to having a more edited space; I'm going to try my absolute hardest to kill the clutter-lover within me and focus in on the few things that I truly find beautiful or useful and not to buy or show pieces that just take up space.
Cottage-- This may seem to clash with the sophisticated side, but I want the entire house to feel comfortable and breezy. I want the [edited, limited number?] items that we do showcase to have real character and give our collections time to really be acquired and not all purchased at a big box store. We have some really great antique shops here in Delaware, and I fully intend to become well acquainted with them all!
3. Consider how you'll use the room. I want our entire house to be USED. I don't want a room cordoned off because it's "too nice" for the kids to use. I want our family and our guests to feel welcome and comfortable going anywhere in our house. Our home should be a home and not a show piece, while still being beautiful.
4. Assess your stuff. This will be an on going process. As I've said before, we have many pieces that I bought intending them to be 'forever' and I think they will be. A few of these are the dining room set, the piano, the guest room bed and a few lamps. We'll just have to wait and see what happens with everything else.
5. Draw up a floor plan. We'll be doing this room by room, though I have started thinking about the overall floor plan of the house and thinking about whether or not we may want to make a few really big changes (knocking down walls, etc) in the future.
 |
| The fabric shades in this office from Lonny is the main inspiration for my own office plan. |
7. Research, Research, Research. If you've seen my pinterest, you know I do this already! I'm always looking for new ideas, new products, and vendors for the products I've gotten into my head that I won't be compromising on (such as a navy blue linen-esque track arm sectional sofa with a sleeper and a left arm chaise...I.will.find.you.).
8. Create a design scheme. This is a transition step where you consolidate all the information you've gathered--your floor plan, the items you need to purchase, pieces you're keeping, images of favorite items and fabrics and paints, etc. Then you assess how it all fits together, think on your priorities and make changes to your plans accordingly. I think making a rudimentary mood board would be a huge help in this step.
 |
| Sarah Richard Designs shower stall inspiration for the downstairs guest bath. |
So there you are. The 9 step decorating process from Domino: The Book of Decorating and where we really are in the process.
Now that you know my overall design scheme, do you have any suggestions for brands or designers I need to check out for inspiration? Any ideas on color schemes? Anybody want to give me about $25,000 so we can knock down a wall in the bathroom soon?
5.26.2011
Progress!
April was a very busy month for our little family. We had visitors two different weekends, then came Easter. Easter is probably my favorite holiday. In the past, I've invited friends who don't have family locally for a big Easter dinner. But this year we kept it low key and just took our little group of four to Cracker Barrel and relaxed. We gave the girls Easter baskets each with a book (from Nana & Papa), a white eyelet sunhat, and a flower headband. It was really a nice day.
And now somehow May has slid right by us, too! It's amazing how time flies!
House progress is going quite slowly. I have lots of vision in my head, but, of course it takes time and money. My current focus has been the girls' room, and we've made a lot of progress since our upstairs tour. Everything has been reoriented and we now have two cribs! The girls seem to be handling the separation pretty well, thank goodness!
Our bedding is called Sweet Stitches by Kenneth Brown. The colors I am pulling out to put in the room are hot pink, light pink, aqua and kelly green. I know that's 4 colors, PLUS the wall color which is a neutral yellow shade. But this is a kid's room and I think an injection of fun colors is important! Hopefully it will all pull together!

So let's get started with the Progress Tour. This is a WAY before shot, but it will give you a better idea of how far we have come! Notice the trim is painted tan, and there are dusty tan mini-blinds on the windows!

And here's how she looks from the door today! The wall colors actually ARE the same, it's just the lighting and trim colors that are different.
We still have some work to do. On each of the following progress shots, I've typed in what's yet-to-be-done.

When you walk in the door, the left wall has 12 built-in drawers. Well, 10 drawers, 1 laundry chute and a fake drawer. Many of you may know that I am on the hunt for drawer pulls. I need 24 matching pulls. I made the mistake of finding 8 of a style I really liked and buying them on ebay, thinking that I could find the other 16 relatively easily. This is not true. I'm looking for porcelain back plated bail pulls. It sounds complicated, but it really isn't! They were pretty standard back in the 40s, and somehow the style has completely disappeared. I intend to paint/glaze the porcelain back plates a fun color.
I made the roman shades using mini-blinds and some guidance from Jennifer at The Newlywed Diaries and a tutorial from Jenny at the Little Green Notebook. It was a great project, and if anyone is interested, I'd be glad to give you some tips that made it easier for me. However, since both of those gals wrote such great pieces on the project, I won't rehash it here on Cottage1910.

Here's the wall you first saw when walking through the door. I would like to put up some large-scale art (I have an idea, and I've even bought a portion of the make-my-own art, but you'll have to wait for another post!) and then make some simple bookshelves to mount on the wall. This is another project I'm going to make you wait for, but trust me, it's going to be great!
I will eventually make a lumbar pillow to go in the rocker. I would like to someday get a proper side table and lamp for reading bedtime stories, too.

Here is the area above the cribs. We have a friend in Atlanta (Thanks, Micah!) who painted the custom canvases for us, and they match the bedding set really well. You can see in this picture how perfect the blue she chose goes with the blue on the bumpers! I want to find a way to tie the entire area together. I'm not sure if this will be using some fun initials (as pictured) or another idea I've yet to find, or even a combo of those two. Can you spot the project from this post?
And yes, I know I may have to move the cribs away from the dresser when the girls are big enough to crawl out onto it.

And here is our final wall, looking back at the doorway and down the stairs (baby gate coming soon!). Because the windows in this room don't reach anywhere near the ceiling, I'm thinking of adding an interesting border around the room. I'm not saying I'll be using a standard wallpaper border! I'm thinking of anything from pom-pom garland to starting a collection of the girls' artwork to scalloped wood molding. I'll be sure to keep you updated!
I already have a photo of a beautiful flower by my friend Megan Floyd to be framed and hung on the wall with growth charts for the girls.
- find, buy, paint and install handles on all 12 drawers (24 handles total)
- finish large art project for over rocking chair area
- make and install wall-mounted bookshelves
- side table and lamp for reading
- initials or other art project for over the dresser
- frame and hang flower photo
- hang growth charts
- buy and install a light fixture. I thought I had my mind made up with this birdy orb, but I'm wondering if the color is right. So my other option is this daisy chandelier.
- Decide on a border (if any), make/buy/acquire it, and install.
Considering that we started in a blank and empty room with tan trim, federal style drawer pulls and dusty mini-blinds, I'm actually feeling pretty good with how far we've come!
What do you think? Are five colors too many? Which light fixture do you like best? Any ideas for inexpensive garland or something other than wallpaper border to go along the top of the room?
5.11.2011
The Art of Filling Space
I've been working on a progress post for the girls' room for a week or two now. Unfortunately, nap time is when I typically take photos and write blog posts, and nap time is the one time of day I can't get in their room to take some shots! I'm hoping that on Saturday the girls can have some fun Daddy Time while I snap, load and edit some shots to share. Thanks for hanging in there!
I've been having a bit of a dilemma, and I'm hoping my wonderful readers (all 8 of you) could give me some tips.
I'm currently in the planning stages for our next room project, the dining room. I have a paint color in mind, as well as the look of drapes and a rug picked out, though I haven't found them yet. And I really think I've found the new light fixture (it's currently on sale. I'm really hoping it stays on sale for another week or two so I can buy it at 15% off!). I'm hoping to share some inspiration shots soon, and then a "mood board" of sorts before I really get started.
My problem is wall space, and what to do with it. Our dining room has lots of empty wall space. Check out these two before shots.

It's possible that many years in the future (8, probably) we may remove the wall from the door frame to the window wall to open up a bar area to the kitchen. Who knows. But for 2011-2019, that's a lot of blank wall space. And that Paris poster you can barely see sitting on top of the piano? I've had it since college. It's time for it to find a new life. Maybe in the guest room, if I'm honest with myself, but maybe just out of this house.

Here's the other side of the room. Lovely French doors to add some interest, but you can still see three blanks walls (well, except for that old thermostat thingy-ma-jigger that we don't think works anymore but not sure if we should take it down).
I'm not one of those decorators who feels as though I need to fill all the space. I'm all for a clean and edited accessories scheme. But I'm really struggling with what to put up in some of these spaces. I've trolled the local antiques markets and as much etsy as I can, but nothing has really struck me. I love almost all types of art, but I don't want items that screaming "DINING ROOM!" like photos of vegetables.
Here's one last picture where you can see most of the dining room. You still can't see the archway wall, but it's mostly archway and will just be painted.

What about you? How do you select art and accessories for your space? Do you just grab what you like and figure out where to place it later? Do you get an idea and hunt doggedly for that one perfect item? Any good tips for me or an etsy shop you've seen lately and love?
I've been having a bit of a dilemma, and I'm hoping my wonderful readers (all 8 of you) could give me some tips.
I'm currently in the planning stages for our next room project, the dining room. I have a paint color in mind, as well as the look of drapes and a rug picked out, though I haven't found them yet. And I really think I've found the new light fixture (it's currently on sale. I'm really hoping it stays on sale for another week or two so I can buy it at 15% off!). I'm hoping to share some inspiration shots soon, and then a "mood board" of sorts before I really get started.
My problem is wall space, and what to do with it. Our dining room has lots of empty wall space. Check out these two before shots.

It's possible that many years in the future (8, probably) we may remove the wall from the door frame to the window wall to open up a bar area to the kitchen. Who knows. But for 2011-2019, that's a lot of blank wall space. And that Paris poster you can barely see sitting on top of the piano? I've had it since college. It's time for it to find a new life. Maybe in the guest room, if I'm honest with myself, but maybe just out of this house.

Here's the other side of the room. Lovely French doors to add some interest, but you can still see three blanks walls (well, except for that old thermostat thingy-ma-jigger that we don't think works anymore but not sure if we should take it down).
I'm not one of those decorators who feels as though I need to fill all the space. I'm all for a clean and edited accessories scheme. But I'm really struggling with what to put up in some of these spaces. I've trolled the local antiques markets and as much etsy as I can, but nothing has really struck me. I love almost all types of art, but I don't want items that screaming "DINING ROOM!" like photos of vegetables.
Here's one last picture where you can see most of the dining room. You still can't see the archway wall, but it's mostly archway and will just be painted.

What about you? How do you select art and accessories for your space? Do you just grab what you like and figure out where to place it later? Do you get an idea and hunt doggedly for that one perfect item? Any good tips for me or an etsy shop you've seen lately and love?
4.01.2011
Regrets
I never said I would only share my successes on this blog, so here it goes.
When we bought this house, one of the big selling points for me was that there were "hardwoods underneath!!" the less-than-a-year-old carpets. Since they were covered with carpets, I always assumed they would need some refinishing, and I was actually happy about that. I prefer my wood floors to be a shade or two darker than the traditional oak or maple stains. But when house hunting, there's really no good way to check out the state of the hardwoods under the carpet. You really have to get down on your knees and pull up corners and realtors (and sellers) kind of look down on that kind of behavior. Additionally, just a peek in the corner of the room doesn't tell you anything about the true state of the floors.
 Case in point: the downstairs powder room. As I mentioned here, there is carpet in every room except the upstairs bathroom, which includes the kitchen and downstairs bathroom. I've pulled up a corner in the kitchen, and unfortunately there's some pretty gross laminate there. A few weeks ago, I pulled up a corner of the shag (yes, shag) in the bathroom. The corner looked GREAT. It was a maple color, which I can live with, and I could tell that the boards were about 1 1/2 inches wide. Not the most exciting find, but I was itching to get the carpet out from around the toilet. So I put the girls down for their long afternoon nap and started pulling.
 I'm really hoping that this isn't a foreshadowing of what we will find when we pull up the carpet in the rest of the house. Not only is there paint rings and splotches on the wood, but there are gaps between the boards. And the boards are a tiny bit cupped (the boards don't lay flat--the edges are higher than the middle) and the boards at the base of the toilet are in REALLY bad shape. In fact, I'm not even showing you a picture of the boards around the toilet. And I stuck carpet back around those boards for now.
A large part of me really does regret pulling up the carpet. Every time I see the floor in this bathroom, my heart sinks and my stomach tightens up just thinking about the possible expense and frustration of having to put in ALL NEW hardwoods throughout the house. This makes for a lot of running upstairs to go to the bathroom (helping lose some of the leftover twin weight, perhaps?).
On the other hand, at least now I know what our future may bring. Now I know to spend some more time saving up for new floors instead of rushing into the renovation and being surprised with thousands of dollars of unexpected expenses. And it does give me a good excuse to go out and buy a new bathroom rug. One just the right size to fill the floor, except that one nice looking corner.
When we bought this house, one of the big selling points for me was that there were "hardwoods underneath!!" the less-than-a-year-old carpets. Since they were covered with carpets, I always assumed they would need some refinishing, and I was actually happy about that. I prefer my wood floors to be a shade or two darker than the traditional oak or maple stains. But when house hunting, there's really no good way to check out the state of the hardwoods under the carpet. You really have to get down on your knees and pull up corners and realtors (and sellers) kind of look down on that kind of behavior. Additionally, just a peek in the corner of the room doesn't tell you anything about the true state of the floors.
 Case in point: the downstairs powder room. As I mentioned here, there is carpet in every room except the upstairs bathroom, which includes the kitchen and downstairs bathroom. I've pulled up a corner in the kitchen, and unfortunately there's some pretty gross laminate there. A few weeks ago, I pulled up a corner of the shag (yes, shag) in the bathroom. The corner looked GREAT. It was a maple color, which I can live with, and I could tell that the boards were about 1 1/2 inches wide. Not the most exciting find, but I was itching to get the carpet out from around the toilet. So I put the girls down for their long afternoon nap and started pulling.

A large part of me really does regret pulling up the carpet. Every time I see the floor in this bathroom, my heart sinks and my stomach tightens up just thinking about the possible expense and frustration of having to put in ALL NEW hardwoods throughout the house. This makes for a lot of running upstairs to go to the bathroom (helping lose some of the leftover twin weight, perhaps?).
On the other hand, at least now I know what our future may bring. Now I know to spend some more time saving up for new floors instead of rushing into the renovation and being surprised with thousands of dollars of unexpected expenses. And it does give me a good excuse to go out and buy a new bathroom rug. One just the right size to fill the floor, except that one nice looking corner.
3.22.2011
Shiny, Shiny!
I have been thinking of this project for months now, and finally the weather was semi-cooperative so that I could accomplish my task last week! You may remember a hand-painted hummingbird figurine from my previous post. I've seen a ton of porcelain figures like this in a variety of themes in stores like goodwill, the salvation army and really any thrift or antique store you walk into.

 2. Prep your piece and your work area. You will definitely need to sand the figurine with a piece of small grit paper. I used a general purpose 150 grit paper. You don't want to scratch the surface of the porcelain, but you do want to rough up the paint finish a little,so that the paint will stick. Use a very light hand with the sandpaper.
 3. Spray painting isn't a one coat process! You'll want to do several light coats. Position your paint can about 10-12 inches from your piece. Depress the nozzle off to the side from your piece. If you start to spray directly on your figure your paint job will be runny and blotchy. Use moderately quick strokes back and forth, constantly depressing the nozzle. Don't worry about hitting all the spots on the figurine since you're going to do more than one coat! Notice in this picture taken after my first coat that you can still see the original paint job under the hummingbirds' wings and there is color peeking through on the branch and grass area. For different coats, I would move the piece around. For the second and third coats, I would lay the hummingbird face down or on its side so I could be sure to get paint in all of the crevices.
 4. WAIT. One of the biggest mistakes is to not let the previous coat completely dry before applying the next. I made myself go back inside and wash dishes or do other tasks while waiting for each coat to dry. Follow the directions on your paint can, but I waited about an hour between each coat. I ended up doing 3 coats and then a touch up.

I loved the detail on this particular piece. The flowers on the branch were well shaped, and there were lots of non-painted details on the branch, wings, and even a molded eye on the bird. This would make a perfect piece for a spray paint project!
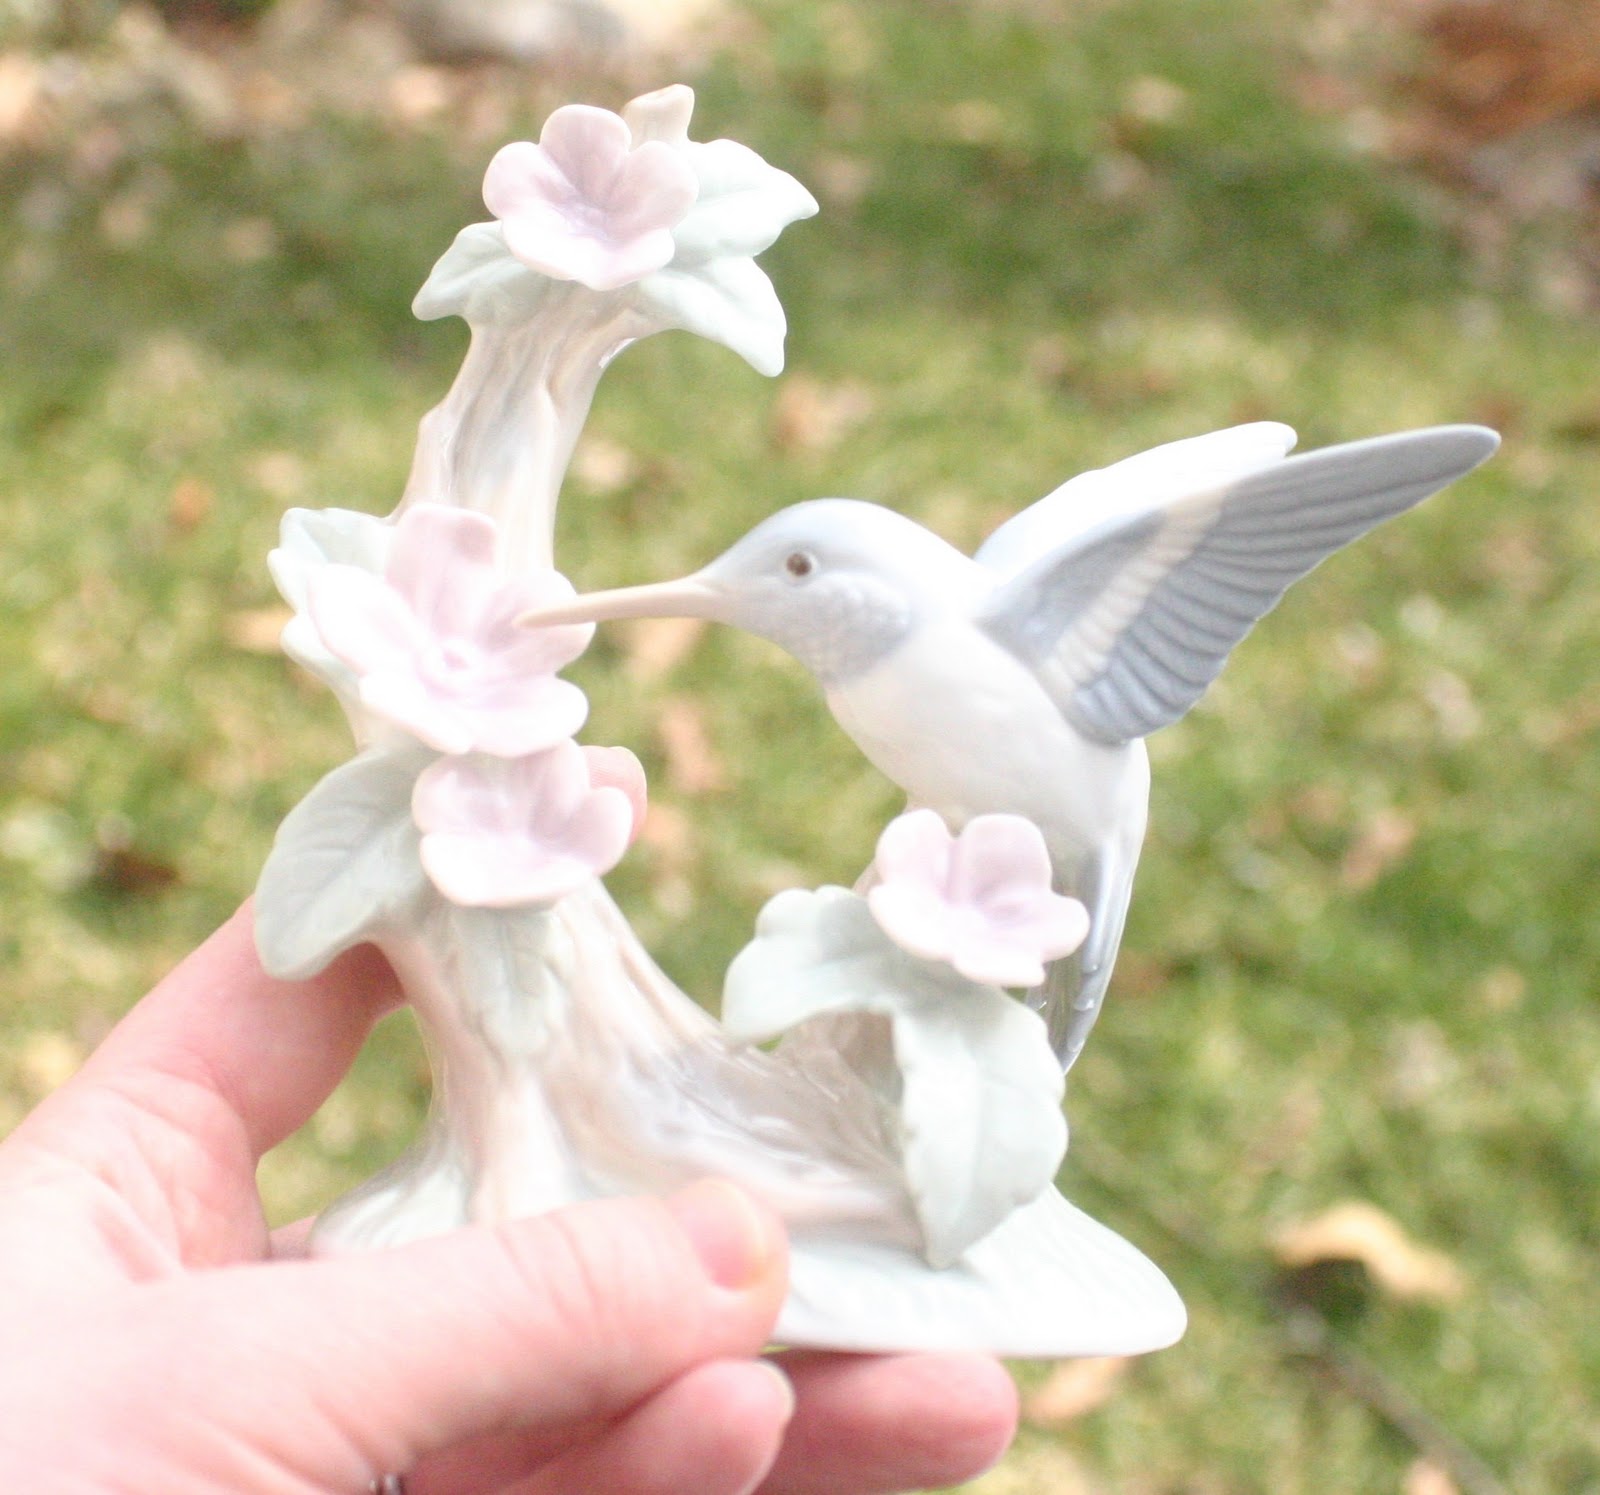
Spray paint has really gotten a bad rap over the years, and I think this is because people think it's going to be a quick fix. To get a really great spray job, you need to prep your piece and be patient! This project took several steps over the course of a sunny (and windy) afternoon.
Here's a short how-to on spray painting porcelain.
1. As I said before, pick a piece with some nice details. Everything will be in one color, so having a piece with molded eyes, wings, clothing, etc will add interest. When selecting a spray paint for this project, I would strongly suggest a metallic so it will look more like an original, instead of a painted piece. I used Rust-oleum Bright Coat Metallic Finish in Chrome.
 2. Prep your piece and your work area. You will definitely need to sand the figurine with a piece of small grit paper. I used a general purpose 150 grit paper. You don't want to scratch the surface of the porcelain, but you do want to rough up the paint finish a little,so that the paint will stick. Use a very light hand with the sandpaper.
 3. Spray painting isn't a one coat process! You'll want to do several light coats. Position your paint can about 10-12 inches from your piece. Depress the nozzle off to the side from your piece. If you start to spray directly on your figure your paint job will be runny and blotchy. Use moderately quick strokes back and forth, constantly depressing the nozzle. Don't worry about hitting all the spots on the figurine since you're going to do more than one coat! Notice in this picture taken after my first coat that you can still see the original paint job under the hummingbirds' wings and there is color peeking through on the branch and grass area. For different coats, I would move the piece around. For the second and third coats, I would lay the hummingbird face down or on its side so I could be sure to get paint in all of the crevices.
 4. WAIT. One of the biggest mistakes is to not let the previous coat completely dry before applying the next. I made myself go back inside and wash dishes or do other tasks while waiting for each coat to dry. Follow the directions on your paint can, but I waited about an hour between each coat. I ended up doing 3 coats and then a touch up.
5. Speaking of touch ups, I had a little mishap where my figure fell over in the wind. When I finally picked it up, there were spots on the wings and side that had pulled off due to being wet and sitting on the paper. I simply sanded those spots (very gently) and resprayed.
6. Let the piece dry completely and then enjoy it!

This photo is the top of the dresser in the girls' room. I realize the painting is too short for this space, or should be hung higher. However, this piece (and a companion) will be hanging over the two cribs when we get the second one. I have plans for what to put over the dresser once that's done, but you'll have to wait and see!
There are a few projects left in this room on top of the second crib arriving in about 2 weeks. I hope to share a window covering project early next week.
What do you think? What spray painting projects have you had success with? Any funny failures we should all hear about?
.


